Building a Mobile Expo Display – Part 1

I’m back…. I went completely MIA for a bit there – Sorry! I really wish that my DS business was my only venture but, unfortunately, it’s not.  Like many of you, I also have a J.O.B. that at time requires all of my attention. However, I have a bit of breathing room now and wanted to share what I’m currently working on. 

At the end of the month, I have a booth at the Connecticut Women’s Expo. It’s a 2-day event that usually draws in about 5,000 women.  There will be vendors from all different companies – I’ll be there with my $5 Paparazzi Jewelry! Yay me!

ctwomensexpofreepass

(click on the image to download your FREE pass to the CT Women’s Expo)

Because this event is larger than your average craft show, I want to create a booth display that is high-end and will give everyone that walks by that shopping feel. I want people to walk by the booth and want to stop, look and shop.  

When you think of most traditional show booths, they tend to be uninviting – it’s usually a 6′ table with too chairs and a backdrop. I’ve attended this show many times and the area where my booth is located most vendors adopt this traditional layout. So most people will stop and look for freebies and move along.  

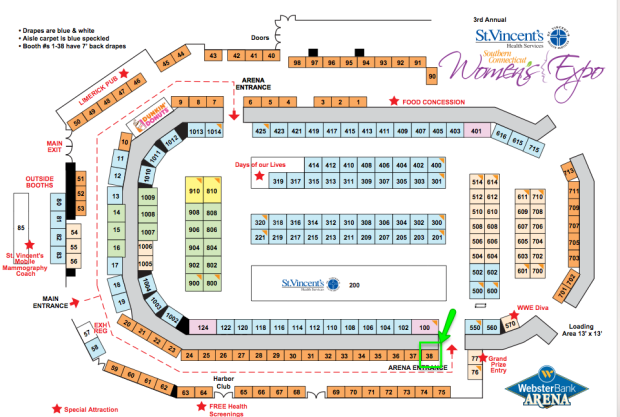
I was able to pick my booth location so I chose a corner booth right at the entrance to the main room and directly across from the giveaway sign-up booth – so I will have a ton of traffic passing by.

expo

(my booth is in the green box)

Picking my booth location wisely is the starting point. My booth is 6′ x 10′, as with every expo there are limitations to the displays that are allowed. In my case, my backdrop can’t be taller than 12′ and my side display no taller than 3′.  So I decided that my display will go smack center and I’m keeping it simple.

I want to create a boutique feel for my display. I did some research and was inspired by Andrea Hutcheson’s Paparazzi on Wheels Display.  I love several elements of her display, however, I need my display to be easy to transport and setup.

Andrea Hutcheson’s Mobile Paparazzi Display Cart – click the image to view her post on how she created her cart.

Over the next few posts I will share elements of my display and where I purchased my items. So let’s start with the largest part of my display – my focal point.  I say it’s a focal point because it is what will make people walk into my booth and browse. It’s the cart piece of my mobile display.

Andrea built here display using a garden wagon and wood pieces.  My schedule doesn’t allow me time to work this part out so I opted for two Origami Baker’s Racks. I love Origami shelves because they don’t require tools to put it together and they are collapsible which makes it super easy to transport.

Origami Baker's Rack

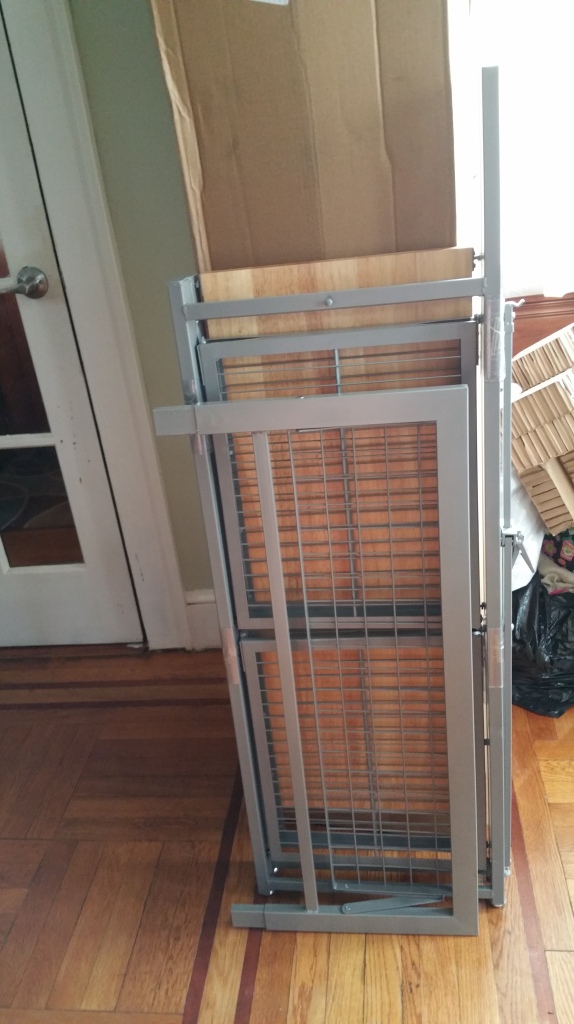
Out of the box – comes in two pieces

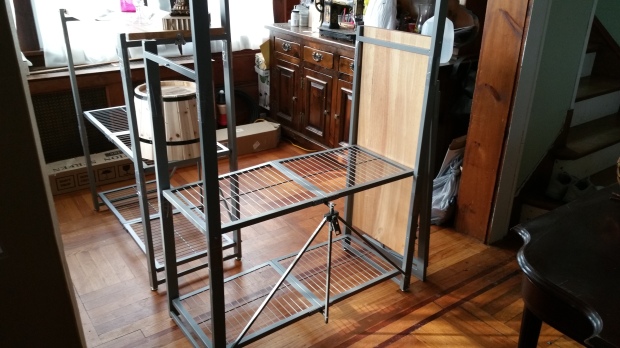
Assembling an Origami Baker's Rack

Easy to assemble and transport

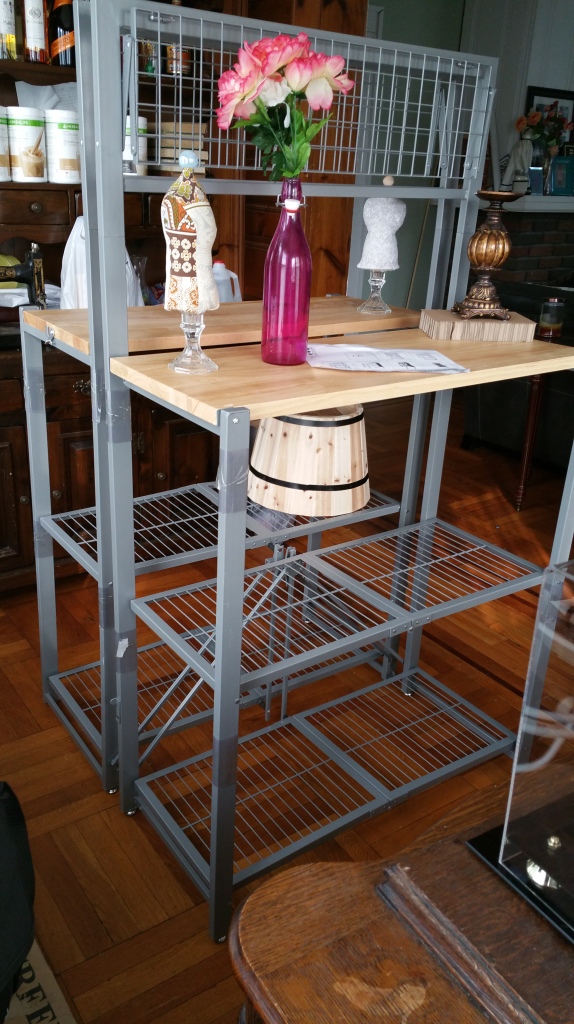
Origami Baker's Rack for Expo Display

Two racks assembled in under 5 minutes

Now the ordering part – I got these on HSN.com – each rack costs $130 –  you can flexpay them at 3 payments of $44.  They weren’t cheap but I can definitely find several uses for them and they collapse for easy storage.

I’m debating on adding the wheels at this point because the display is pretty tall.  the wire toppers are actually shelves, I’m not sure if I’ll use them both as shelves at this point because I do have vintage mirror I want to hang on one of them.

I will be adding a skirt under the 2nd shelf so I will have some storage for extra inventory. I’ll be adding a black shelf liners to the top shelf so visitors won’t be able to look down and see my extra goodies.

There is a gap between the racks when I butt the up back to back, so I plan on using a 2 x 4  to close the gap and add a bit more display space.

In my next post, I’ll share the other elements of my plan.

Do you have a great idea for an expo display? I’d love to hear it.


Become a Social Media Ninja, How to Master Social Selling

I know that those of you reading this posts are all using some form of social media to market your Direct Sales business. I can guarantee that almost all of you are making heavy use of Facebook specifically to market your products.

So you’ve gone ahead and changed the settings on your Facebook profile to include the fact that you now offer some awesome products…..

–you’ve joined some direct sales groups…

–and started your own Facebook Fan Page

…and probably started a blog…

…and maybe even started your very own YouTube channel

You’ve been posting 3 to 5 times a day in an effort to drum up interest. But, let me ask you

Are you actually making money for your social media efforts? 

Remember, time is money… Are your efforts resulting in sales?  Not sure? Mull this over for a minute. If you were to post to Facebook 5 times a day, would you make 5 times as much money as you are right now?

Probably NOT….which means your efforts are generating ZERO, Zilch, Nada Revenue. 

This actually means that you are wasting time and losing money because time IS money!

So how can you change this? You need to first stop posting in locations where you ad/post has a severely short lifespan and won’t get any attention. The do these three things:

Step 1 – Connect

Find out where your target customers are hanging out, and start using that same social media platform! Remember, you need to figure out who your target market is and narrow your efforts down to marketing to your target and only your target.  Everybody is not your target market.

Step 2 – Add Value

Start Posting Content that adds value for your readers.  Lead with VALUE! Instead of asking your prospects to buy directly from your social media page, first provide value and build a relationship.

What do I mean by this? I mean that you need to share a post that will encourage your prospects to click in order to read more (similar to all those quizzes you take on Facebook). An example of a value add post would be something like:

5 Cool Looks For Just $5 
{interesting related image here}
URL to Your Landing Page or Website

When  prospect clicks your link, they would either be direct to your blog, landing page, YouTube channel, mini site or other site that have the offer prominently visible.

Step 3 – Link and Capture 

Let’s say that when they click on the link they are taking to a post on your blog..That post should continue to add value by displaying information on the 5 Cool Looks for Just $5 – you are offering your prospect value without asking them for anything. This is important.

Weave related calls to action in the blog posts. For example, you could pepper in a link that says – “Get this look for yourself for only $5” with  link to your shop or a link to an email opt-in page where they can give you their email address for a chance to Win the said $5 fashion or to continue to get valuable content.

It’s that simple. Three steps is all it takes.  Change the way your market your business and start making your posts count.

I would love to read your questions! Post them as comments below.

How I Got 17,000 Unique Visitors to My Website In 1 Day!

As direct sales reps, we all get some type of snazzy website that we can use to promote out businesses.  Nowadays, however, most people in direct sales seem to have all their focus on Facebook and Facebook alone.  Let’s face it, Facebook is a bit saturated with tons of other direct sales reps viaing for attention.

I belong to several direct sales groups and everyone posts how awesome their products are and how great their business is, but few of those posts get any attention.  I shared how I have been taken a different approach on Facebook and have used Facebook ads and promoted posts instead to drive traffic.  And this is somewhat of an art form with a learning curve.

At the same time, I’ve been experimenting with Solo Ads and ads blast, link blasts, landing pages, and other forms of marketing.  But, then I started doing 1 thing differently and the results are crazy — see for yourself…

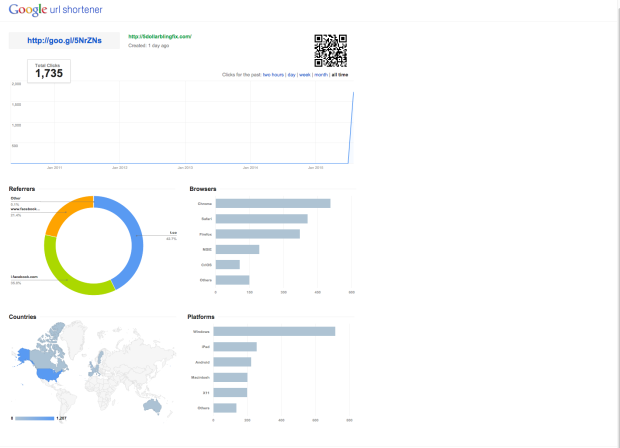
Google-trafficThis is the tracking for a one (1), yes, I said ONE promotion.  It’s like overnight, I got more than 17,000 unique visitors to my website.

oneday

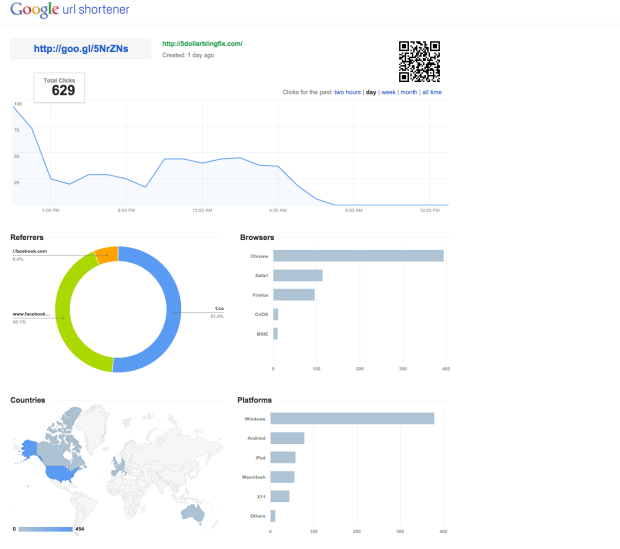
These are the stats for one day of my campaign – 629 visitors in a day (…and it’s only mid-day at the time of writing this posts).

How did I get all this traffic?  

I’ve been experimenting with a number of ad services on Fiverr.com – one of my favorite places, because I also have a shop on Fiverr. Fiverr is a place where you can have people do all sorts of things for you for ONLY $5.

So I outsourced my marketing efforts for one ad as an experiment and the results have been phenomenal.  So far I have 5 people who have filled out the – send me more info form on my website and several bookmarks.

What does it all mean? 

Now, I’m realistic. I know and understand that although I have 17,000 visitors hitting my site, this does not mean they will all convert to sales or join my team.  However, I am gaining increased exposure. People know what I have to offer, they have visited my website and look at my goods.  They now know where they can find the products they are looking for.

There was a marketing study that was conducted that essentially discovered that it required 3 – 5 touches before someone will make a purchase from you. This means that they will need to see your ad, post, link, website, whatever at least 3 to 5 times before they decide to make a purchase.

So, I have a different campaign that is running parallel to this one where I am building my lead list or you can call it an email list. These are people who are signing up because they are interested in what I have to offer and want to get communications from me.

It’s more than just getting a ton of traffic, it’s understanding what to do with that traffic once you get it.  If your direct sales company offers a replicated website that may not be the best working type, then create a landing page where you can capture emails and start building your list so you can make sure you get those 3 – 5 touches with those leads.

Now, it’s your turn…

What activities are you doing to bring traffic to your website and increase your exposure?