DIY Coupon Code / Giveaway Scratch-Off Ticket

Have you ever wanted to do something fun for a home show, craft fair or for your regular customers?  How about scratch tickets?

What you will need:

  • Coupon Codes or Freebie you are giving away –  Cost: whatever the prize is
  • 4×6 Cardstock  – Cost: FREE (if you use junk mail or old holiday cards)
  • Contact Paper or Packing Tape – Cost:  $1 (try Dollar Tree or other $1 store)
  • Metallic Acrylic Paint – Cost: FREE (use any water-based ink or paint you have on hand)
  • Dish Soap – Cost: FREE (we all do dishes)
  • Small Paint Brush – Cost: FREE (use what you have on hand, makeup brushes work)
  • Old plate or wax/parchment paper – Cost: FREE (again, use what you have on hand)
  • Printer – Cost: FREE (technically since you already have it at your disposal. If you don’t have a printer you can hand draw your cards)

Let’s Make Magic:

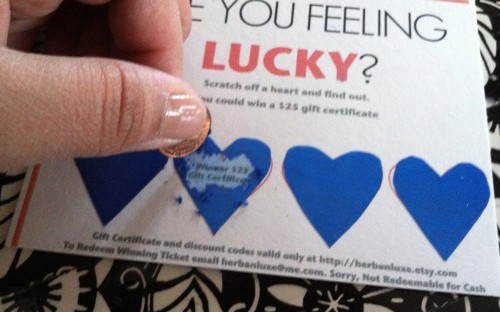
1. If using junk mail, you may want to paint or cover the paper white and let it dry before proceeding. Print your  template  with messages and coupon codes on to your cardstock. I like to have three or four scratch off areas.

Scratch-off_heart template

2. Next cut a strip of contact paper that will fit 3 or 4 of your shapes and trace the shape of the scratch off area to the paper side of the contact paper. If you are using packing tape, you may want to stick the tape to a piece of parchment paper and trace the shape onto the parchment paper.

Trace scratch off area on paper side of contact paper

3. Now it’s time to make the scratch-off magic.  Mix two parts acrylic paint with one part dish soap (example: 2 tbsp paint to 1 tbsp dish soap). The soap prevents the paint from binding together and what you are left with is cool, professional looking scratch-off paint.

Making Magic

4. Next with your small paint brush or sponge brush paint the shiny side of the contact paper. You may need to do two or three coats to get full coverage (make sure you can’t see through it). Let the paint dry completely between coats.

Paint the shiny side of the contact paper


5. Once you are happy with the coverage and it has completely dried, cut out the shapes using the template you drew on the paper side of the contact paper. Remove the paper backing and put the cut-out over the area that has the coupon code or message.  VOILA – You have a scratch off ticket.

DIY Scratch-off Ticket

Easy right? Now it’s time for you to try it.  I’ve created two template which you can edit using Photoshop  or my favorite, http://Pixlr.com.  Each template is a *.psd file which  means you can see and edit the different layers to fit your needs.

Template 1 – heart

Template 2 – clover

DIY Magnet Button Flairs

Hey, Hey!  I just wrapped up a weekend long expo.  It was great!

2015-09-27 09.52.00

For the expo, I wanted to have something fun and free for everyone who stopped by my booth.  So I made magnet and sticker button flair and I’m going to show you how I created them, share some printable and links to where you can get supplies to make you own.

2015-09-24 13.09.02Are you ready?!?

There are super easy to make, here’s what you’ll need (I’ve included links):

  1. 1″ button images that can be printed (download 1, download 2)
  2. Epoxy stickers (Buy them cheap on Etsy here)
  3. Scissors or a 1″ inch punch or a circle cutter that will cut a 1″ inch circle.
  4. Magnetic adhesive strips (get it at the dollar store or a craft store or Wal-Mart)
  5. (OPTIONAL) Key chain with epoxy (kit get it on Etsy here)

I would love to see your creations. Please share them with me at https://www.facebook.com/5dollarswagger


Building a Mobile Display – Part 2

I’m back and this is part two of building a mobile display.  I mentioned in my previous post that I’m getting ready for an Expo at the end of the month.  I shared the core piece of my display, 2 large origami bakers racks that are super easy to lug around and they setup in under 5 minutes. I’m all for quick and easy setups.

Since I’m doing several expos, a good display is needed. Yesterday the 2nd part of my display arrived and a few weekends ago I had picked up some items to use as display also. I’ll share both with you today in this post.

The rotating Necklace Stands

Let’s start with the stands. In her post, Andrea shared two stands that she used to hold necklaces and I thought they were genius – so I had to copycat them – and when I say copycat I mean just straight copy the idea.

I ordered these two stands from Lakeside.com for only $13 each.  The shipping was a bit slow, so if you plan on ordering them – make sure to plan well.  The stands are 26.5″ tall with an 11″ base.The neat thing about the stands is that they come in two pieces for easy transport.

Rotating Jewelry Display

Each stand will hold 4 twirl-a-ties (you can purchase them on amazon for $6.99 for a 2 pack ). I keep a stash of twirl-a-ties because they are inexpensive and great for keeping necklaces organized. If you purchase these stands, you’ll want to flip them so the bottom base is on top – it will hold the twirl-a-ties perfectly.  I turned mine into a rotating jewelry display just by using 2 chip and dip bowls stacked together (seriously!).  Checkout my video below to see how I did it.

You have to admit the stands are awesome and would be perfect for any type of event.

Old Book Displays

Another piece of my display incorporates old books – because I love the shabby chic vintage feel these offer in a modern display. A few weeks ago I went to the Elephant’s Trunk where they shoot Flea Market Flip (they were onsite shooting the show that day – fun).

2015-08-30 11.10.19

This is one of my favorite flea markets.  Anyway, I picked up a stack of old books (circa 1934) for $1 each.

PhotoGrid_1441990782831

I folded a few pages of the books and attached paperclips to a few rings and tucked the paperclips into the folds. The paperclips keep the rings in place and it makes for a really interesting display (and an inexpensive one too).

PhotoGrid_1441990981519

In Part 3 of my Building a Mobile Display series, I’ll share some other fun and inexpensive display ideas that you can use for your own displays.

If you have a creative jewelry display, be sure to share it as a comment below.